
Posted on May 13, 2005
Introduction
|
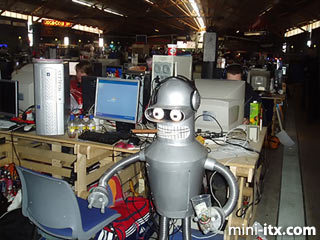
After finishing my last project, I just had to do something new. I thought about what to do for months and had several good ideas, but finally I fell for Bender. I've always been a big Futurama fan and I was 100% certain I'd be able to do this, despite how much time and money I'd spend. I would never have been able to finish this project if I hadn't had help from my friends: Einhar Flå - for welding, Geir Gravem - who calculated the angles and proportions. So a big thanks to these guys.
|
Planning
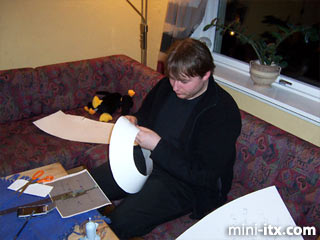
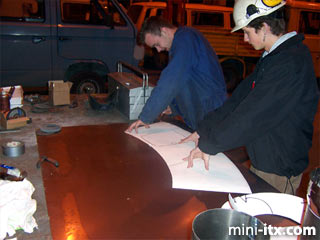
How big was it going to be? And how to fit it all together? This needed to be thought through and I figured out that I could first build a full-size paper figure first, and then make all the mistakes I wanted without wasting time and sheet-metal.
Parts List
• 1 x Slim slot load DVD ROM/CD-burner
• 1 x VIA EPIA M 10000 Mini-ITX motherboard
• 1 x WLAN card with antenna
• 2 x 10 watt light-bulbs (12volt)
• 1 x 120 GB Hard Disk & 4 x external 250 GB disks using Firewire
• Metal ducts (for feet and hands)
• 3 x Metal kitchen bowls (for the top of the head and legs)
• 4-5 paper sheets
• 3 x 0,7 mm pieces of steel sheet-metal
• 1 x Digital voice recorder
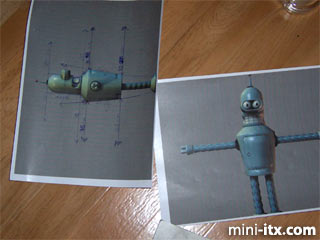
After playing with different 3D programs I managed to print out this 3D-model. I used it as a blueprint where I filled in the measurements for size, and so on.
And so the work with the paper-figure began - calculating angles, finding the correct proportions, etc.
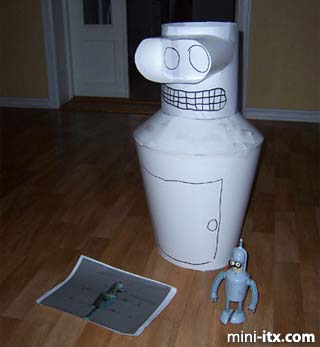
I now had a paper-figure, very crooked but usable. With this paper figure all we have to do is spread out each sheet of paper on the sheet-metal and use them as a template. When all templates and parts we need are finished, we can start building.
Building Bender
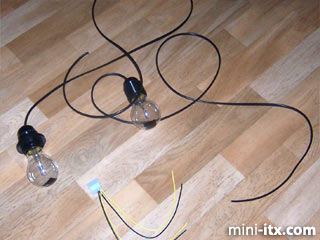
The eyes used 10 Watt Halogen bulbs running on 12 Volts, wired to the PSU. Since these are only 10 Watts and wired serially, they don't get very warm and don't use much power.
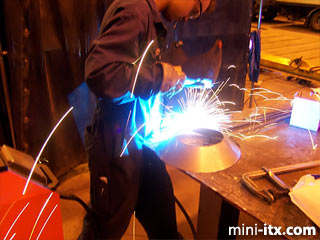
Then the cutting began.
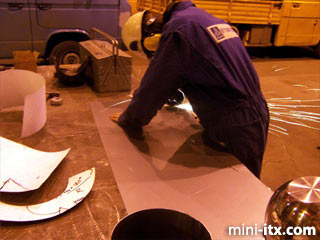
The sheet-metal was cut, rolled until completely round and then welded together.
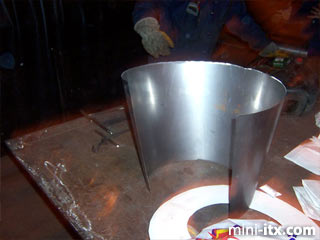
At last Bender was taking shape, but more work remained.
 |
 |
 |
Quick Links
Mailing Lists:
Mini-ITX Store
Projects:
Show Random
Accordion-ITX
Aircraft Carrier
Ambulator 1
AMD Case
Ammo Box
Ammo Tux
AmmoLAN
amPC
Animal SNES
Atari 800 ITX
Attache Server
Aunt Hagar's Mini-ITX
Bantam PC
BBC ITX B
Bender PC
Biscuit Tin PC
Blue Plate
BlueBox
BMW PC
Borg Appliance
Briefcase PC
Bubbacomp
C1541 Disk Drive
C64 @ 933MHz
CardboardCube
CAUV 2008
CBM ITX-64
Coelacanth-PC
Cool Cube
Deco Box
Devilcat
DOS Head Unit
Dreamcast PC
E.T.PC
Eden VAX
EdenStation IPX
Encyclomedia
Falcon-ITX
Florian
Frame
FS-RouterSwitch
G4 Cube PC
GasCan PC
Gingerbread
Gramaphone-ITX-HD
GTA-PC
Guitar PC
Guitar Workstation
Gumball PC
Hirschmann
HTPC
HTPC2
Humidor 64
Humidor CL
Humidor II
Humidor M
Humidor PC
Humidor V
I.C.E. Unit
i64XBOX
i-EPIA
iGrill
ITX Helmet
ITX TV
ITX-Laptop
Jeannie
Jukebox ITX
KiSA 444
K'nex ITX
Leela PC
Lego 0933 PC
Legobox
Log Cabin PC
Lunchbox PC
Mac-ITX
Manga Doll
Mantle Radio
Mediabox
Mega-ITX
Micro TV
Mini Falcon
Mini Mesh Box
Mini-Cluster
Mobile-BlackBox
Moo Cow Moo
Mr OMNI
NAS4Free
NESPC
OpenELEC
Osh Kosh
Pet ITX
Pictureframe PC
Playstation 2 PC
Playstation PC
Project NFF
PSU PC
Quiet Cubid
R2D2PC
Racing The Light
RadioSphere
Restomod TV
Robotica 2003
Rundfunker
SaturnPC
S-CUBE
SEGA-ITX
SpaceCase
SpacePanel
Spartan Bluebird
Spider Case
Supra-Server
Teddybear
Telefunken 2003
TERA-ITX
The Clock
ToAsTOr
Tortoise Beetle
Tux Server
Underwood No.5
Waffle Iron PC
Windows XP Box
Wraith SE/30
XBMC-ION