
Posted on 21 January 2003
Introduction
|

So I was walking around a toy store waiting for my wife to finish looking at the Barbie toys one day (before anyone asks, yes, she is more than eight years old and I love the fact that she is still into toys) and I saw this cool looking toy of the aircraft carrier Enterprise. I looked closer at it, and thought that it might be big enough to hold one of those great Mini-ITX motherboards from VIA. Since the toy was only $19.99, I decided to get it.
Upon getting home, I ripped open the box and confirmed that the width of the toy at it's largest area was a little over 17cm wide. The Mini-ITX would be a tight fit, but it would work.
I could see it all now - runway lights, planes on the deck, control switches on the command center - it looked great. All that was left was the planning, cutting, building, painting, and tweaking. No problem!
In reality, it was a 4 month project that was more difficult than many would claim just by looking at the mod. Let's go over the individual pieces and show what it took to create the mod.
Mouse
At first, I bought a cheap ball mouse with the idea to paint it like a ship. I would have a "missile bay" on the back by placing rows of red/white/blue LEDs. I also masked off alternating sections of the white mouse cable and dyed the cable as well, leaving some sort of a warning tether.
After doing all this, it worked but it didn't really look like a ship to me. I loved the way the cable looked, however.
Another trip to the toy store and I found a small police hydro-foil ship. I bought it, took it apart, bought another mouse (optical this time), and transferred the guts into this new toy. The result is a little strange and different, but cool (I think).
There were several challenges along the way. For example, the guts of the optical mouse were way too long and wide. For the length, I cut off the sections for the buttons since I would be using my own buttons anyway. The problem with the width was more difficult. I used my Dremel to grind away the outer traces on the circuit board and used bits of wire to reconnect the traces.
|

A toy I purchased at my local toy store.
|
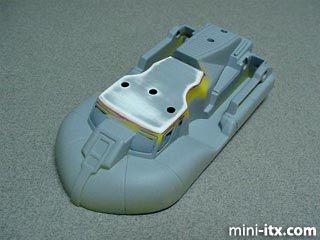
The top piece with some sheet plastic added to cover the holes, some putty & sanding, and a slight coat of primer. I've also drilled holes for some LEDs and some buttons.
|
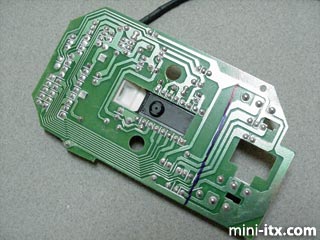
Optical mouse electronics. It was too big - I had to cut off the pieces with the buttons and reroute some traces with wire and grind away the side of the board.
|
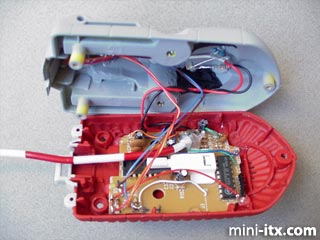
The electronics housed in the mouse, with all the tweaks. It still works!
|

This is how it's held. The front button is the left mouse button, the one behind is the right. It looks strange, but doesn't feel that bad.
 |
 |
 |
Quick Links
Mailing Lists:
Mini-ITX Store
Projects:
Show Random
Accordion-ITX
Aircraft Carrier
Ambulator 1
AMD Case
Ammo Box
Ammo Tux
AmmoLAN
amPC
Animal SNES
Atari 800 ITX
Attache Server
Aunt Hagar's Mini-ITX
Bantam PC
BBC ITX B
Bender PC
Biscuit Tin PC
Blue Plate
BlueBox
BMW PC
Borg Appliance
Briefcase PC
Bubbacomp
C1541 Disk Drive
C64 @ 933MHz
CardboardCube
CAUV 2008
CBM ITX-64
Coelacanth-PC
Cool Cube
Deco Box
Devilcat
DOS Head Unit
Dreamcast PC
E.T.PC
Eden VAX
EdenStation IPX
Encyclomedia
Falcon-ITX
Florian
Frame
FS-RouterSwitch
G4 Cube PC
GasCan PC
Gingerbread
Gramaphone-ITX-HD
GTA-PC
Guitar PC
Guitar Workstation
Gumball PC
Hirschmann
HTPC
HTPC2
Humidor 64
Humidor CL
Humidor II
Humidor M
Humidor PC
Humidor V
I.C.E. Unit
i64XBOX
i-EPIA
iGrill
ITX Helmet
ITX TV
ITX-Laptop
Jeannie
Jukebox ITX
KiSA 444
K'nex ITX
Leela PC
Lego 0933 PC
Legobox
Log Cabin PC
Lunchbox PC
Mac-ITX
Manga Doll
Mantle Radio
Mediabox
Mega-ITX
Micro TV
Mini Falcon
Mini Mesh Box
Mini-Cluster
Mobile-BlackBox
Moo Cow Moo
Mr OMNI
NAS4Free
NESPC
OpenELEC
Osh Kosh
Pet ITX
Pictureframe PC
Playstation 2 PC
Playstation PC
Project NFF
PSU PC
Quiet Cubid
R2D2PC
Racing The Light
RadioSphere
Restomod TV
Robotica 2003
Rundfunker
SaturnPC
S-CUBE
SEGA-ITX
SpaceCase
SpacePanel
Spartan Bluebird
Spider Case
Supra-Server
Teddybear
Telefunken 2003
TERA-ITX
The Clock
ToAsTOr
Tortoise Beetle
Tux Server
Underwood No.5
Waffle Iron PC
Windows XP Box
Wraith SE/30
XBMC-ION