
Posted on Jan 19th, 2006
Introduction

I had built a few projects, including a carputer for my '79 Camaro and a small computer out of a radio controlled car shell with flashing lights on HDD activity etc, all of which use ideas taken from this website.
This, my first original computer design came out of frustration and I hope one day we will see a case that allows people to bolt together their own laptop in a weekend - and not have to spend days in the shed annoying the neighbours with my angle grinder and learning how to mig weld aluminium like I did!
There are 'bare bones' kits from some manufacturers, but you are still expected to pay through the nose. To have one designed around standard Mini-ITX components would be great for the kind of people who do not want a laptop that we can fit in an envelope, rather a unit that we can use all around the house for a decent price.
I decided to create a laptop that at any point, I could upgrade every component as they grew too old. For very little money, I have created a 2GHz processor laptop with 1GB Ram, and an ATI Radeon 9200 128MB graphics card. OK, so it is a PCI graphics card and could be faster, but everything is upgradable - I could slot in a motherboard with PCI Express in the future.
The size of this could have been a lot smaller. With a Nano-ITX mainboard and no external graphics card it could almost be as small as a regular laptop, but that was not my plan. It needed to be as powerful as a regular desktop or I could not use it every day for office applications and games.
Early Cardboard Box Experiments
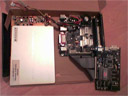
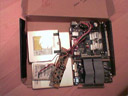
First I got all my components together, measured them and checked the layout in a cardboard box. Then I left it on the kitchen table for a few weeks and generally annoyed my girlfriend.
 |
 |
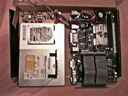 |
You can see the battery under the DVD drive and the PSU which I took from an old Morex case from Mini-ITX. The riser card cable is fabulous - it sits the ATI 9200 card nicely in the case.
Internal Layout
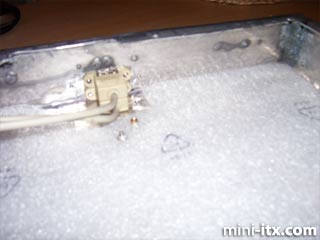
I made the main case from Aluminium to the same dimensions of my cardboard prototype, and started to fit my components. This is the USB extender cable.
The 2GHz Jetway motherboard and low profile RAM.
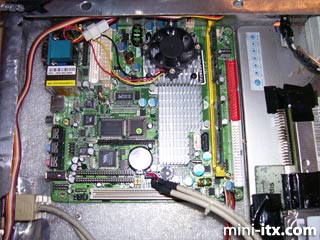
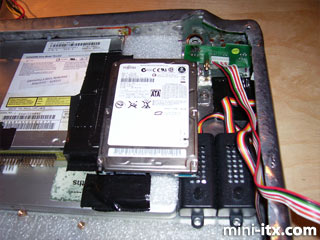
The slimline optical drive, laptop sized hard drive and two fan speed controllers. The power and reset buttons came from my original donor Mini-ITX case.
I took the speakers from the monitor I dismantled. The plug and socket above the motherboard is the 12V supply to the monitor.

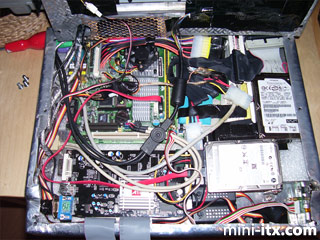
The new improved internal layout. One IDE drive and one SATA drive. A 2 GHz motherboard with 1GB of RAM. You can see the fan controllers at the front, and the new Pico power supply which saves me lots of room. What cables and wires?
 |
 |
 |
Quick Links
Mailing Lists:
Mini-ITX Store
Projects:
Show Random
Accordion-ITX
Aircraft Carrier
Ambulator 1
AMD Case
Ammo Box
Ammo Tux
AmmoLAN
amPC
Animal SNES
Atari 800 ITX
Attache Server
Aunt Hagar's Mini-ITX
Bantam PC
BBC ITX B
Bender PC
Biscuit Tin PC
Blue Plate
BlueBox
BMW PC
Borg Appliance
Briefcase PC
Bubbacomp
C1541 Disk Drive
C64 @ 933MHz
CardboardCube
CAUV 2008
CBM ITX-64
Coelacanth-PC
Cool Cube
Deco Box
Devilcat
DOS Head Unit
Dreamcast PC
E.T.PC
Eden VAX
EdenStation IPX
Encyclomedia
Falcon-ITX
Florian
Frame
FS-RouterSwitch
G4 Cube PC
GasCan PC
Gingerbread
Gramaphone-ITX-HD
GTA-PC
Guitar PC
Guitar Workstation
Gumball PC
Hirschmann
HTPC
HTPC2
Humidor 64
Humidor CL
Humidor II
Humidor M
Humidor PC
Humidor V
I.C.E. Unit
i64XBOX
i-EPIA
iGrill
ITX Helmet
ITX TV
ITX-Laptop
Jeannie
Jukebox ITX
KiSA 444
K'nex ITX
Leela PC
Lego 0933 PC
Legobox
Log Cabin PC
Lunchbox PC
Mac-ITX
Manga Doll
Mantle Radio
Mediabox
Mega-ITX
Micro TV
Mini Falcon
Mini Mesh Box
Mini-Cluster
Mobile-BlackBox
Moo Cow Moo
Mr OMNI
NAS4Free
NESPC
OpenELEC
Osh Kosh
Pet ITX
Pictureframe PC
Playstation 2 PC
Playstation PC
Project NFF
PSU PC
Quiet Cubid
R2D2PC
Racing The Light
RadioSphere
Restomod TV
Robotica 2003
Rundfunker
SaturnPC
S-CUBE
SEGA-ITX
SpaceCase
SpacePanel
Spartan Bluebird
Spider Case
Supra-Server
Teddybear
Telefunken 2003
TERA-ITX
The Clock
ToAsTOr
Tortoise Beetle
Tux Server
Underwood No.5
Waffle Iron PC
Windows XP Box
Wraith SE/30
XBMC-ION