
Posted on June 17, 2004
Introduction
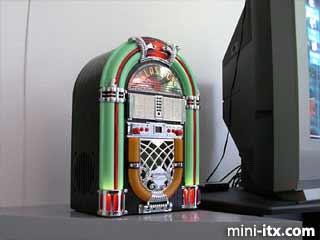
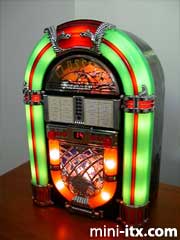
The basic idea was to create a working mini Jukebox with a Mini-ITX system. I bought a miniature retro-50s JukeBox on the web for $70 USD.
|
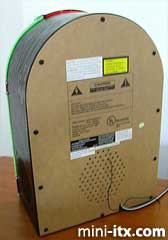
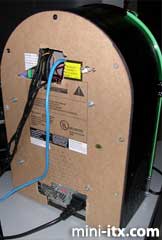
This was what the back of the box looked like originally:
The box was quite large by Mini-ITX standards, so I won't belabor the building process too much because it was really rather simple. The most difficult part was actually the lighting on the front of the box.
This is what was originally inside the box:
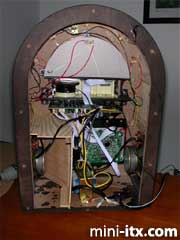
The JukeBox was basically a CD player/radio. All of that stuff has to go, especially those two enormous hard-drive eating speakers. The next picture shows the box mostly gutted. I later removed all the wiring to the lights inside because it was a series of incandescent bulbs in series and I didn't care to try to wire that into the power supply nor did I want to deal with one of them burning out.
|

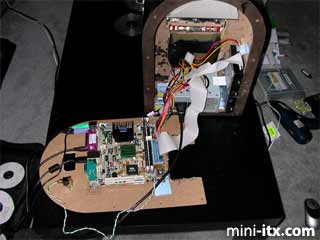
I had plenty of space. The only real problem was that the box was about 2 cm too shallow to have the motherboard's ports face the back of the box. I didn't want to mar the smooth outer surface of the box and didn't want wires sticking out the side, so I was forced to mount the motherboard vertically, with the ports not directly exposed. It was easy to do this and mount the hard drive and power supply. I had to buy a new Seagate hard drive because the Maxtor I used was absurdly loud for this purpose. The Seagate is essentially silent (the Maxtor is shown in the picture.) Similar thing for the power supply. The first one I bought was too loud, so I later replaced it with a silent one.
|
I thought about using one of the JukeBox's front controls for the power button, but decided against it since I didn't want guests to be clicking the buttons and turning off the box, so I placed a simple soft switch on the back. You might wonder where the CD drive is. I decided not to install one because I do not intend to use it anyway as I use my desktop computer for ripping CDs. So I merely attached one while I installed Windows 2000 and the Itx drivers and then removed it. For other purposes, I will use either the USB or Network ports.
As I said, wiring the lighting was one of the hardest parts. I flirted with a couple of ideas, but decided to use high-intensity LEDs and glow-wire. I like the lighting effects much better than the original because the glow-wire gives a nice neon effect and I like the red patches lit up selectively instead of the blotchy effect of the original. The original lighting is shown in the following photo:
|
It's true that the original was more brightly lit, but considering I planned on setting it beside my TV, this wasn't really an asset.
This shows the back of the unit, everything all wired up. The top part of the back panel can be removed separately from the part holding the motherboard for easy access to the ports.
One of the design goals was to connect the box to my surround-sound system using its optical input, so I got a cheap ($40 USD) SoundBlaster USB with optical out. Also, I didn't want any unsightly controls, so I got a wireless mouse and keyboard and I already had a Streamzap PC Remote for multimedia use.
|
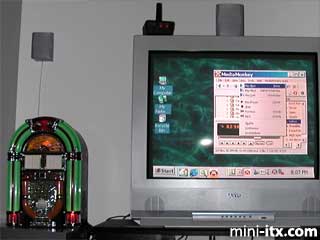
The final photo shows the box up and running and connected to my 27” TV. I think it looks really nice like that. I am currently running MediaMonkey as my MP3 library software.
 |
 |
 |
Quick Links
Mailing Lists:
Mini-ITX Store
Projects:
Show Random
Accordion-ITX
Aircraft Carrier
Ambulator 1
AMD Case
Ammo Box
Ammo Tux
AmmoLAN
amPC
Animal SNES
Atari 800 ITX
Attache Server
Aunt Hagar's Mini-ITX
Bantam PC
BBC ITX B
Bender PC
Biscuit Tin PC
Blue Plate
BlueBox
BMW PC
Borg Appliance
Briefcase PC
Bubbacomp
C1541 Disk Drive
C64 @ 933MHz
CardboardCube
CAUV 2008
CBM ITX-64
Coelacanth-PC
Cool Cube
Deco Box
Devilcat
DOS Head Unit
Dreamcast PC
E.T.PC
Eden VAX
EdenStation IPX
Encyclomedia
Falcon-ITX
Florian
Frame
FS-RouterSwitch
G4 Cube PC
GasCan PC
Gingerbread
Gramaphone-ITX-HD
GTA-PC
Guitar PC
Guitar Workstation
Gumball PC
Hirschmann
HTPC
HTPC2
Humidor 64
Humidor CL
Humidor II
Humidor M
Humidor PC
Humidor V
I.C.E. Unit
i64XBOX
i-EPIA
iGrill
ITX Helmet
ITX TV
ITX-Laptop
Jeannie
Jukebox ITX
KiSA 444
K'nex ITX
Leela PC
Lego 0933 PC
Legobox
Log Cabin PC
Lunchbox PC
Mac-ITX
Manga Doll
Mantle Radio
Mediabox
Mega-ITX
Micro TV
Mini Falcon
Mini Mesh Box
Mini-Cluster
Mobile-BlackBox
Moo Cow Moo
Mr OMNI
NAS4Free
NESPC
OpenELEC
Osh Kosh
Pet ITX
Pictureframe PC
Playstation 2 PC
Playstation PC
Project NFF
PSU PC
Quiet Cubid
R2D2PC
Racing The Light
RadioSphere
Restomod TV
Robotica 2003
Rundfunker
SaturnPC
S-CUBE
SEGA-ITX
SpaceCase
SpacePanel
Spartan Bluebird
Spider Case
Supra-Server
Teddybear
Telefunken 2003
TERA-ITX
The Clock
ToAsTOr
Tortoise Beetle
Tux Server
Underwood No.5
Waffle Iron PC
Windows XP Box
Wraith SE/30
XBMC-ION