
Posted on 30 July 2004
Introduction
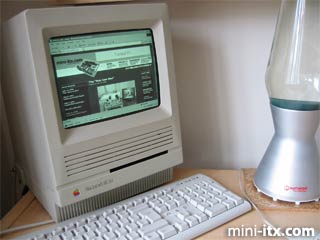
I think the classic compact Macs still look pretty cool, but there was nothing useful to do with my old SE/30 sitting up in the loft. Still, I did want a media server for the living room, and I did want to do a mini-ITX project, and I did want to do some engineering that didn't involve Powerpoint. So, the Mac-ITX was conceived.
|
Now, I am hardly the first person to put an ITX board in a Mac case, but I was after something a bit different from all the other ones I've seen. Normally the Mac case ends up with lots of ugly mods to it. Inspired by the Stealth SX64 mod I wanted to make it as close to the original Mac as possible - keep the whole look and feel intact. By the way, unlike most ITX mods this one involves lethal high voltages. Don't attempt this unless you really know what you are doing.
The first challenge is what to do with the display. Most Mac ITX mods replace the Mac's black and white CRT with an LCD in the bezel. For me that little curved 9" monitor is a key part of the retro appeal, so I wanted to keep it. My first experiments were to connect the old Mac's analog electronics to the output of my PC. I managed to get a picture but there turns out to be a lot of work to do before getting a good solution this way. The Mac's original monitor circuit really does only support black and white (no greys!) and you would have to design a new CRT driver circuit to make the conversion.
|
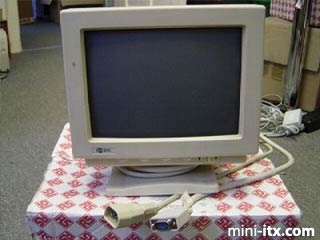
So switch to plan B. Buy a 9" PC monitor off ebay and fix it in to the Mac's case. After a few weeks searching I finally found a likely candidate from a company that produces TV game shows who were selling off some monitors previously used by audience members to cast their votes. Getting it home and ripping the guts out the Mac and the monitor showed that (hooray) the tube is almost exactly the same dimensions as the Mac original, and fits perfectly in the original mounting points without any modification.
|
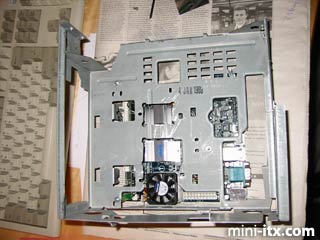
Unfortunately I wasn't quite so lucky with the circuit board. The Mac had its analog electronics on a board mounted sideways next to the CRT. The new monitor board won't fit there. I finally managed to squeeze it in above the disk drives and just below the CRT. I also had to turn around the original front-panel controls to face inside the case. Adjustments now have to be done with a very long insulated probe! Fortunately once set right they don't need to be changed. With the CRT and the board in I now had an SE/30 changed in to a black and white monitor.
|

The ITX board goes where the original Mac's logic board was - in a little space under the Mac's internal sub-frame. This space is wedge-shaped and higher at the front than the back. The Mac designers must have really thought in 3D because all the Mac boards only fit because of the way the heights of the components are distributed. Luck was with me here because the ITX board almost has the same height profile. Strip off the daughter board for the CF and PC-Card slots and it'll just about fit. A bit of cutting needed to give enough room for the heat sinks and IO ports.
|
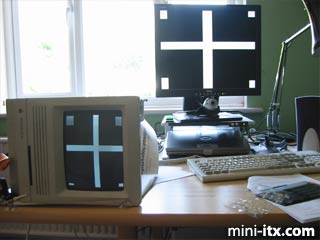
For the PSU I wanted to keep the Mac's original mains input and also power the monitor and computer together. I managed to find a 1U server PSU which would fit in the shell of the old Mac PSU (with a bit of sawing). Fitting the optical drive was a labour of love. The aim was to make it fit almost invisibly behind the floppy slot of the Mac. For the drives I used a lap-top HD and a slot-load DVD. With some very careful cutting the Mac's floppy slot was widened to take a CD. The HD and DVD were mounted on a support hacked out of the original Mac's HD bracket. Finally we got time to test the system before fitting it all together.
 |
 |
 |
Quick Links
Mailing Lists:
Mini-ITX Store
Projects:
Show Random
Accordion-ITX
Aircraft Carrier
Ambulator 1
AMD Case
Ammo Box
Ammo Tux
AmmoLAN
amPC
Animal SNES
Atari 800 ITX
Attache Server
Aunt Hagar's Mini-ITX
Bantam PC
BBC ITX B
Bender PC
Biscuit Tin PC
Blue Plate
BlueBox
BMW PC
Borg Appliance
Briefcase PC
Bubbacomp
C1541 Disk Drive
C64 @ 933MHz
CardboardCube
CAUV 2008
CBM ITX-64
Coelacanth-PC
Cool Cube
Deco Box
Devilcat
DOS Head Unit
Dreamcast PC
E.T.PC
Eden VAX
EdenStation IPX
Encyclomedia
Falcon-ITX
Florian
Frame
FS-RouterSwitch
G4 Cube PC
GasCan PC
Gingerbread
Gramaphone-ITX-HD
GTA-PC
Guitar PC
Guitar Workstation
Gumball PC
Hirschmann
HTPC
HTPC2
Humidor 64
Humidor CL
Humidor II
Humidor M
Humidor PC
Humidor V
I.C.E. Unit
i64XBOX
i-EPIA
iGrill
ITX Helmet
ITX TV
ITX-Laptop
Jeannie
Jukebox ITX
KiSA 444
K'nex ITX
Leela PC
Lego 0933 PC
Legobox
Log Cabin PC
Lunchbox PC
Mac-ITX
Manga Doll
Mantle Radio
Mediabox
Mega-ITX
Micro TV
Mini Falcon
Mini Mesh Box
Mini-Cluster
Mobile-BlackBox
Moo Cow Moo
Mr OMNI
NAS4Free
NESPC
OpenELEC
Osh Kosh
Pet ITX
Pictureframe PC
Playstation 2 PC
Playstation PC
Project NFF
PSU PC
Quiet Cubid
R2D2PC
Racing The Light
RadioSphere
Restomod TV
Robotica 2003
Rundfunker
SaturnPC
S-CUBE
SEGA-ITX
SpaceCase
SpacePanel
Spartan Bluebird
Spider Case
Supra-Server
Teddybear
Telefunken 2003
TERA-ITX
The Clock
ToAsTOr
Tortoise Beetle
Tux Server
Underwood No.5
Waffle Iron PC
Windows XP Box
Wraith SE/30
XBMC-ION