
Posted on February 3, 2003
I am unfortunately one of those people who feel that any event, regardless of magnitude needs to be well documented photographically, unfortunately I have both run out of walls and surfaces for framed pictures as well as friends who I can torture by making them leaf through albums. However, a Mini-ITX motherboard seemed to offer a solution to my dilemma.. therefore I set out to make a wall mountable picture frame.
My first acquisition was a 15" Phillips 105S3 LCD from my nearby office supply store, which given a generous use of price matching, coupons and rebates came in at an affordable price. This LCD was then mounted into a frame, including glass and a 2.5 inch mat, which I had located that would provide me with the 2.75 inches of depth for the whole machine I thought I would need. (an assumption later proven wrong).
|
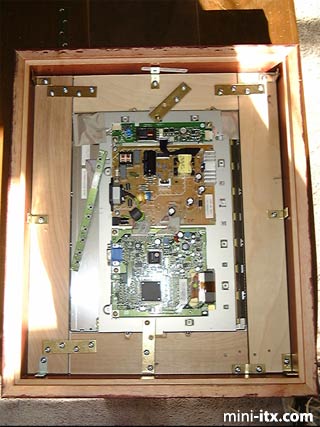
The frame I used came with a back rabbet to which I attached a 1/4'" plexiglass sheet with a piano hinge on which to mount the additional computer components, these were:
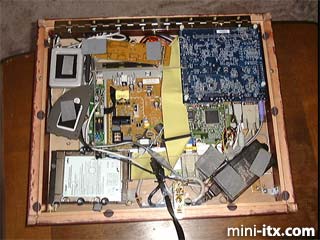
Motherboard: EPIA ME 6000
RAM: 256 MB PC2100
Hard Drive: Seagate Barracuda IV 40 GB
Microsoft USB 802.11b wireless network adapter
Wireless keyboard and mouse receiver
ATI remote wonder
AC/DC power converter block from a Cubid 2677R case
DC/DC power converter
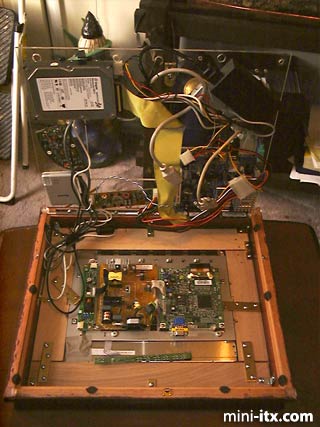
All the parts except for the motherboard and hard drive were attached using heavy duty Velcro, allowing me to reposition them to determine the optimum position.
|
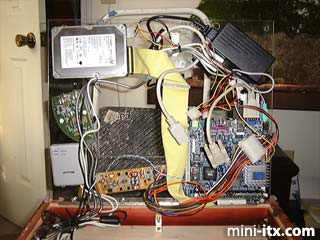
I also included rubber grommets on the hard drive to decrease vibration. Unfortunately during this stage I found out that given the depth of my frame, the motherboard would not fit no matter which way I turned it. So I turned to the dremel and wire snips and removed the audio outputs as well as the parallel port (it is only going to be a frame). I won't torture you with pictures of my poor mangled EPIA. Next I cut the power cords for both the monitor and the AC/DC converter and spliced them together to a single power supply cord. I then cut a large hole in the center of the plexiglass where I didn't have any parts attached and drilled several ½" holes to allow sufficient air flow along the back of the computer.
|
No fans allowed.
|
 |
 |
 |
Quick Links
Mailing Lists:
Mini-ITX Store
Projects:
Show Random
Accordion-ITX
Aircraft Carrier
Ambulator 1
AMD Case
Ammo Box
Ammo Tux
AmmoLAN
amPC
Animal SNES
Atari 800 ITX
Attache Server
Aunt Hagar's Mini-ITX
Bantam PC
BBC ITX B
Bender PC
Biscuit Tin PC
Blue Plate
BlueBox
BMW PC
Borg Appliance
Briefcase PC
Bubbacomp
C1541 Disk Drive
C64 @ 933MHz
CardboardCube
CAUV 2008
CBM ITX-64
Coelacanth-PC
Cool Cube
Deco Box
Devilcat
DOS Head Unit
Dreamcast PC
E.T.PC
Eden VAX
EdenStation IPX
Encyclomedia
Falcon-ITX
Florian
Frame
FS-RouterSwitch
G4 Cube PC
GasCan PC
Gingerbread
Gramaphone-ITX-HD
GTA-PC
Guitar PC
Guitar Workstation
Gumball PC
Hirschmann
HTPC
HTPC2
Humidor 64
Humidor CL
Humidor II
Humidor M
Humidor PC
Humidor V
I.C.E. Unit
i64XBOX
i-EPIA
iGrill
ITX Helmet
ITX TV
ITX-Laptop
Jeannie
Jukebox ITX
KiSA 444
K'nex ITX
Leela PC
Lego 0933 PC
Legobox
Log Cabin PC
Lunchbox PC
Mac-ITX
Manga Doll
Mantle Radio
Mediabox
Mega-ITX
Micro TV
Mini Falcon
Mini Mesh Box
Mini-Cluster
Mobile-BlackBox
Moo Cow Moo
Mr OMNI
NAS4Free
NESPC
OpenELEC
Osh Kosh
Pet ITX
Pictureframe PC
Playstation 2 PC
Playstation PC
Project NFF
PSU PC
Quiet Cubid
R2D2PC
Racing The Light
RadioSphere
Restomod TV
Robotica 2003
Rundfunker
SaturnPC
S-CUBE
SEGA-ITX
SpaceCase
SpacePanel
Spartan Bluebird
Spider Case
Supra-Server
Teddybear
Telefunken 2003
TERA-ITX
The Clock
ToAsTOr
Tortoise Beetle
Tux Server
Underwood No.5
Waffle Iron PC
Windows XP Box
Wraith SE/30
XBMC-ION