
Posted on August 13, 2004
Introduction
|
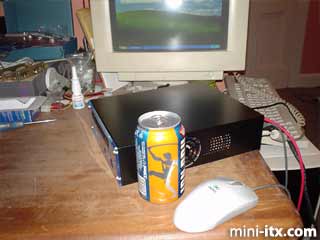
I got interested in Mini-ITX when I saw how small they could be, and how quiet they were claimed to be. The last PC I built was an Athlon 1333 system, and I spent a lot of money on making it quiet: Enermax Whisper PSU, a huge Alpha PAL heatsink, and Papst fans. I wanted another PC to be a Linux server and internet router, my desk is in the living room, and I didn't want to go to those lengths again, so I thought, yeah, why not, it doesn't need to be super-fast, so one of these Mini-ITX systems should do just fine. Looking into it, I thought I might as well make the box play DVDs too; I hadn't got one. I bought myself a Cubid 3688 case, an EPIA M II 10000, the then-new Seagate Momentus with 8MB cache, memory, and a Sony CD/DVD drive. I put it together straight away and was fairly pleased with the results, and initially installed Windows XP to test everything out - getting the Linux drivers right can be a pain so it's handy to make sure everything actually works properly first. The problem was - it was noisy. It wasn't desperately noisy, but enough that having it on 24/7 in the living room wasn't on. It was certainly much noisier than my quiet Athlon box which has 5 fans in it. I planned to make it quieter.
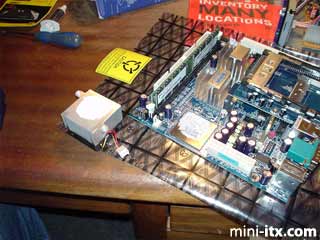
The great folks at Mini-ITX.com already listed some possible solutions, the Zalman NB47J motherboard heatsink and the Zalman Fan Mate 1, so I got them ordered up. I thought that using that heatsink without a fan on it should be fine as it would be mounted right next to the Cubid case's own fan which should provide for some airflow; I got the Fan Mate because I wanted to slow the fan down just a touch to take away the worst of the noise it made. At the same time, I ordered some rounded UDMA cables and the other kind of 2.5" hard drive adapter - you may be interested to know that with the standard converter cable the EPIA boards won't go any faster than UDMA/33, but with this thing and a proper 80-conductor UDMA cable they go to UDMA/100, not that it makes a huge difference. I already had a tube of Arctic Silver heat transfer compound in my spares box, but the Zalman comes with some so you don't have to go looking for it unless you want to shave another couple of degrees off the temperatures.
Before I started I thought I ought to have a look at what temperatures the system was running at already.
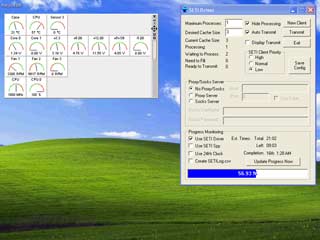
I already take part in the SETI@home project, which keeps my Athlon system nice and warm, and I use Motherboard Monitor to see what temperature things are running at. Just to make sure, though, I thought I'd try CPUburn too:
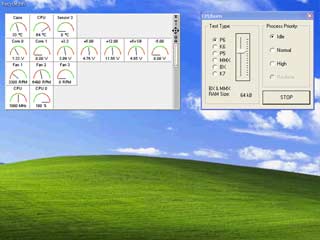
CPUburn is hand-written assembly language which thrashes your CPU to within an inch of its life. Sadly, but perhaps unsurprisingly, there isn't a version for the Nehemiah, but it still pushes your CPU temperature way over what any normal flat-out use would be, so you can use it to check for temperature stability problems. So, there's my "before" temperatures: 57°C under SETI@home and 64°C under CPUburn, both after the system had been running for hours, the CPUburn temperature reached after an extra 15 minutes.
A word about CPU temperatures: on older systems, where the CPU doesn't have an on-die temperature sensor but there's one on the motherboard underneath the CPU, the sensors under-read, as they touch the back of the CPU not the hot part of the case. On that kind of system, a reading of 60°C or over is horrendously high and something should be done to cool the CPU down before the blue smoke comes out. Some manufacturers' BIOSes adjust the reading to take into account the under-read, though, so don't panic so long as a cold system reads somewhere in the high 40s. Anyway, more modern systems where the CPU does have an on-die temperature sensor, you're getting the CPU core junction temperature, and you're getting it correctly. VIA specify that the Nehemiah can tolerate a case temperature of 85°C, which is the equivalent to an on-die junction temperature of about 110°C with the standard heatsink and fan, so getting a reading of 64°C is well within safe limits.
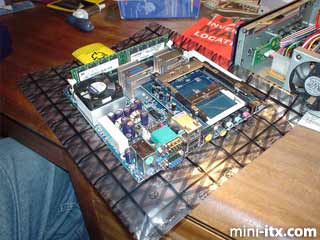
Now to the project. I took my system apart and took the motherboard out. The first thing to do was to remove the standard heatsink and fan. It's attached by two plastic push-pins. I used a small pair of pliers to squeeze and then push them slightly through their holes:
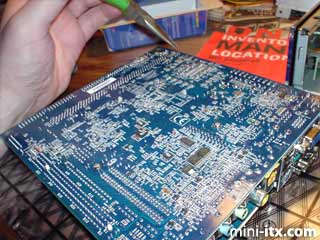
The picture's not terribly clear, probably because I was attempting to point the pliers at one of the push-pins and maneuvre the camera at the same time, and I wasn't entirely successful. You can see one of the push-pins right below the tip of the pliers, but that might be one of the ones that holds the other heatsink on, and you should be careful not to pop the wrong ones - I found several flips of the board necessary to make sure I got the right ones. Having loosened the two push-pins, I flipped the board over, unplugged the fan header cable, and gently teased the heatsink away from the board; it's mounted with white heatsink compound so it doesn't just fall off - nor is it glued on - and when I was done it looked like this:
Now I cleaned up the mess of the old heatsink compound. I used a spray of isopropyl alcohol on a lint-free cloth, because that's probably the best way of ensuring there's no residue afterwards. Using another solvent-based cleaning product might do, but you can buy a bottle of isopropyl alcohol from any good chemist, or failing that you can get a spray can of the stuff from Maplin or RS. The point is that once your cloth has lifted off the actual muck you want to be sure any remaining cleaner just evaporates. It's probably worth mentioning that you should make sure your work area is well-ventilated when working with solvents. Here's my system looking shiny and clean:
 |
 |
 |
Quick Links
Mailing Lists:
Mini-ITX Store
Projects:
Show Random
Accordion-ITX
Aircraft Carrier
Ambulator 1
AMD Case
Ammo Box
Ammo Tux
AmmoLAN
amPC
Animal SNES
Atari 800 ITX
Attache Server
Aunt Hagar's Mini-ITX
Bantam PC
BBC ITX B
Bender PC
Biscuit Tin PC
Blue Plate
BlueBox
BMW PC
Borg Appliance
Briefcase PC
Bubbacomp
C1541 Disk Drive
C64 @ 933MHz
CardboardCube
CAUV 2008
CBM ITX-64
Coelacanth-PC
Cool Cube
Deco Box
Devilcat
DOS Head Unit
Dreamcast PC
E.T.PC
Eden VAX
EdenStation IPX
Encyclomedia
Falcon-ITX
Florian
Frame
FS-RouterSwitch
G4 Cube PC
GasCan PC
Gingerbread
Gramaphone-ITX-HD
GTA-PC
Guitar PC
Guitar Workstation
Gumball PC
Hirschmann
HTPC
HTPC2
Humidor 64
Humidor CL
Humidor II
Humidor M
Humidor PC
Humidor V
I.C.E. Unit
i64XBOX
i-EPIA
iGrill
ITX Helmet
ITX TV
ITX-Laptop
Jeannie
Jukebox ITX
KiSA 444
K'nex ITX
Leela PC
Lego 0933 PC
Legobox
Log Cabin PC
Lunchbox PC
Mac-ITX
Manga Doll
Mantle Radio
Mediabox
Mega-ITX
Micro TV
Mini Falcon
Mini Mesh Box
Mini-Cluster
Mobile-BlackBox
Moo Cow Moo
Mr OMNI
NAS4Free
NESPC
OpenELEC
Osh Kosh
Pet ITX
Pictureframe PC
Playstation 2 PC
Playstation PC
Project NFF
PSU PC
Quiet Cubid
R2D2PC
Racing The Light
RadioSphere
Restomod TV
Robotica 2003
Rundfunker
SaturnPC
S-CUBE
SEGA-ITX
SpaceCase
SpacePanel
Spartan Bluebird
Spider Case
Supra-Server
Teddybear
Telefunken 2003
TERA-ITX
The Clock
ToAsTOr
Tortoise Beetle
Tux Server
Underwood No.5
Waffle Iron PC
Windows XP Box
Wraith SE/30
XBMC-ION