
Posted on January 31, 2003
When I was ready to make the lid, I reached for some masking tape ($.50) and a marker. I wrapped the top of the box to protect it from the marker. I then held the pegboard ($3.00 - $4.00) on the top while Kristi traced the shape onto it. The wall thickness on the box is ¼” so at all of the corners I put a dot a quarter inch in. I then traced between the dots and cut the lid out. After dry fitting it I marked where the floppy drive would sit. I went back to the jig saw and cut that out. Kristi then sprayed down the cover with adhesive ($2.00) and wrapped it (wrapping material $5.00 a yard, half yard was plenty). I drilled a hole and mounted the knob ($.50). The screw for the knob was too long so I cut a piece of my Bic pen ($.20) to fill in the gap. Have a look below at the before and after… Nice!
Cut pegboard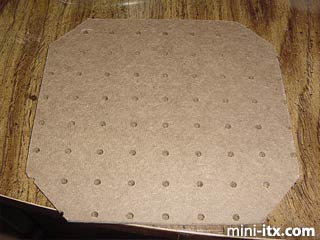
Kewl lid :) 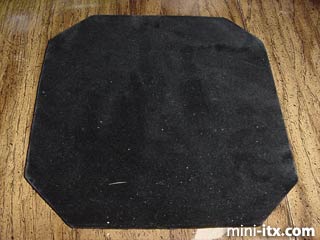
Moving on, I sprayed ($1.00) the bezel of the DVD drive black and wrapped that as well. I test fitted the drive on the lid and noticed that the top of the door was hitting the top corners of the drive. I took out the file on my Leatherman and rounded them off. I then touched up the freshly filed corners with some paint.
Filed bezel and lid knob 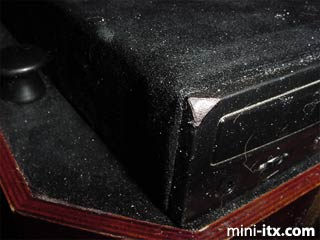
At this point I soldered the wires to my new switch ($2.00), drilled a hole for it, and mounted it to the box. I then began to mount everything else inside. I had to remove the mounting bracket from the modem, because it was in the way. I once again cut a piece of my Bic pen to use in between the modem and the bottom of the box. I ran a bolt (10 for $1.50) through the modem ($10.00), through the Bic, and out the bottom of the box. Everything else went in and was strapped together.
That's how it all fits 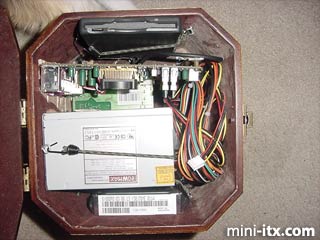
I filled in any divots with wood putty ($1.50) and purchased a stain marker ($2.00) from the hardware store to cover my efforts. I also used the stain marker on the inside of all of my cuts. It really cleaned up the holes nicely.
Finished product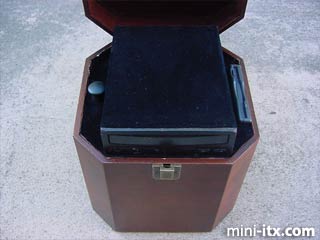
Switch at back right near the bottom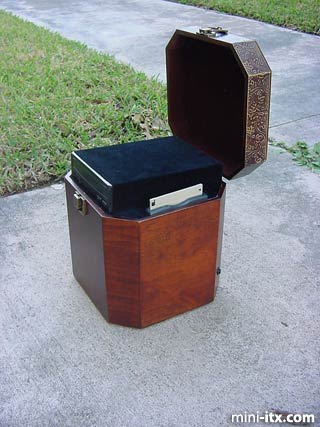
Wow, I need to clean the back! 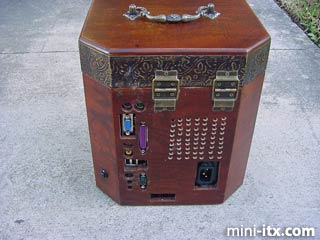
Conclusion
This project did take me slightly longer than I thought, but I finished it all in one weekend. I hope that maybe this gave you a few ideas for your next project. Be watching for my next Mini-ITX project, because it’s going to be slightly more outlandish! If you weren’t paying attention to all my costs it was around $300.00. Although I did have a lot of extra materials left over. Any questions, comments, or foul language can be directed to me. Thanks for reading, and if you want to see more, then email me! Feedback is greatly desired!
PC Specs for the curious (in case you were wondering what was in there)...
- VIA EPIA 800 motherboard
- 20GB Maxtor 7200 RPM Hard Drive
-
Intel PCI 56k Modem
-
2 Sticks generic 256 Meg PC133 memory
-
Aopen 16x DVD
- USB Mitisumi Floppy Drive
- Wireless M$ Keyboard and mouse
- Windows 98 SE
Project kindly donated by extensiontech.net
 |
 |
 |
Quick Links
Mailing Lists:
Mini-ITX Store
Projects:
Show Random
Accordion-ITX
Aircraft Carrier
Ambulator 1
AMD Case
Ammo Box
Ammo Tux
AmmoLAN
amPC
Animal SNES
Atari 800 ITX
Attache Server
Aunt Hagar's Mini-ITX
Bantam PC
BBC ITX B
Bender PC
Biscuit Tin PC
Blue Plate
BlueBox
BMW PC
Borg Appliance
Briefcase PC
Bubbacomp
C1541 Disk Drive
C64 @ 933MHz
CardboardCube
CAUV 2008
CBM ITX-64
Coelacanth-PC
Cool Cube
Deco Box
Devilcat
DOS Head Unit
Dreamcast PC
E.T.PC
Eden VAX
EdenStation IPX
Encyclomedia
Falcon-ITX
Florian
Frame
FS-RouterSwitch
G4 Cube PC
GasCan PC
Gingerbread
Gramaphone-ITX-HD
GTA-PC
Guitar PC
Guitar Workstation
Gumball PC
Hirschmann
HTPC
HTPC2
Humidor 64
Humidor CL
Humidor II
Humidor M
Humidor PC
Humidor V
I.C.E. Unit
i64XBOX
i-EPIA
iGrill
ITX Helmet
ITX TV
ITX-Laptop
Jeannie
Jukebox ITX
KiSA 444
K'nex ITX
Leela PC
Lego 0933 PC
Legobox
Log Cabin PC
Lunchbox PC
Mac-ITX
Manga Doll
Mantle Radio
Mediabox
Mega-ITX
Micro TV
Mini Falcon
Mini Mesh Box
Mini-Cluster
Mobile-BlackBox
Moo Cow Moo
Mr OMNI
NAS4Free
NESPC
OpenELEC
Osh Kosh
Pet ITX
Pictureframe PC
Playstation 2 PC
Playstation PC
Project NFF
PSU PC
Quiet Cubid
R2D2PC
Racing The Light
RadioSphere
Restomod TV
Robotica 2003
Rundfunker
SaturnPC
S-CUBE
SEGA-ITX
SpaceCase
SpacePanel
Spartan Bluebird
Spider Case
Supra-Server
Teddybear
Telefunken 2003
TERA-ITX
The Clock
ToAsTOr
Tortoise Beetle
Tux Server
Underwood No.5
Waffle Iron PC
Windows XP Box
Wraith SE/30
XBMC-ION